Sunday, August 28, 2005

Dismantling of Laptop is Done!

Well, I've finished dismantling the laptop and have discarded(actually boxed in case I need something) all the pieces that I don't think I will need for the project.
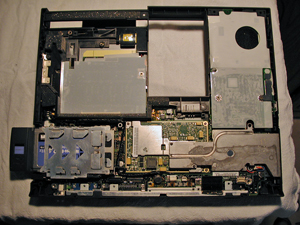
Here's what's left of the laptop:
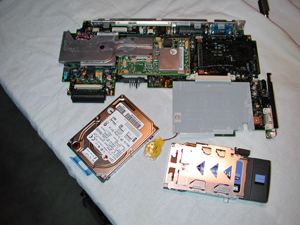
That's the hard drive on the lower left, the PCMCIA assemply on the lower right, and the System board with the RAM assembly attached at the top. the AC power socket and keyboard/mouse socket are indeed part of the systemboard assembly.

I struggled a bit getting the system board out of the plastic case. It just didn't want to come free, and I was afraid of forcing it and breaking something. I would work on it a while, set it aside, then go back and try again. After considerable amount of gentle prodding and coaxing, it finally came free and popped out intact.

The next step is to re-connect only these components, mate it with the LCD screen and (cross fingers) see if it plays ....................... And:

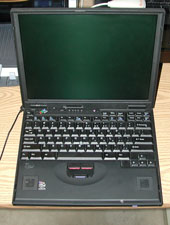
It's a beautiful thing.

The major project milestone has been reached successfully.

I'm having some difficulties getting the wireless network going again, but that's probably just a matter of playing and tinkering with it some.

There may be a lag in the project while I get that working, then try to figure out how to secure everything in a standard picture frame.

Friday, August 26, 2005

Moving On - The Final Dis-assembly

Well, here it is - what's left of a perfectly good, functioning Laptop computer:

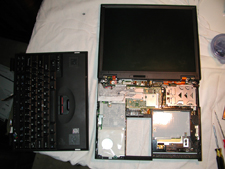
Within this conglomeration of stuff are some pieces and parts that are critical to the project. What I want to do here is remove those critical pieces and discard the rest. Not only do I want to remove the critical parts, but I need to do it in such a manner that I can re-assemble them in working order so that when I re-attach the LCD, it all boots up and plays and displays the slideshows as expected.

The critical pieces are: the system board, the PCMCIA (network) assembly, the hard drive assembly, and the RAM assembly. I also need a functioning On/Off switch, and the AC Power socket, and the Keyboard/Mouse socket. These may be part of the system board, but I won't know that for sure until I get further into the dis-assembly.

I'll try to get this done today, and will have a follow-up once I get it apart, and the critical pieces re-assembled and working to my satisfaction.

Fingers are crossed!

Friday, August 19, 2005

LCD Assembly Removed & Dismantled - Yeah

Before I start, I'm not sure if I mentioned previously that all the tech manuals for the Thinkpads are available in PDF format from Lenovo Support (They bought the PC division of IBM). These manuals describe the maintenance procedures including removal & parts replacement - in detail. They have been invaluable to me in this process.

I started on the LCD removal around 10AM and finished successfully at 1PM. It really didn't take that long (I had a bit of lunch.... etc), but I went very carefully and didn't want to force or break anything. Of course, my goal in this step is to plug it in to the system board after removal and dissassembly and have it boot up and work.

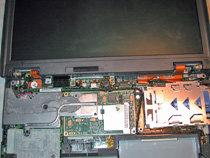
I've gotta get that top screen assembly off, then remove the LCD

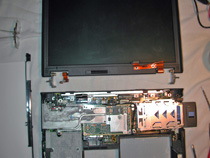
Well, they're separated - now to get the LCD out of the frame.

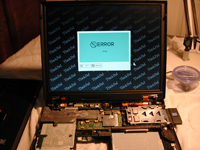
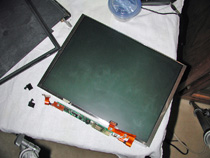
There it is in all it's nakedness - Hope it still works

and Voila: 
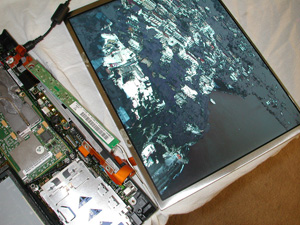
Slideshow is running and displaying fine ---- Yeah!.

This thing is rapidly ceasing to be a laptop computer.

Tomorrow or Sunday, I'll start removing the system board, RAM, PCMCIA, and HD assys -- then we'll re-connect all the wiring and see if the thing still plays.

Thursday, August 18, 2005

Problem Solved

The booting without a keyboard problem was becoming very difficult indeed. I asked on several Tech Forums if there was a way to boot without a keyboard. The consensus answer was No, it couldn't be done.

I began to contemplate taping the keyboard assembly onto the back, but that really seemed klugy to me.

I went back and re-read the details of all of the Thinkpad based digital picture frame projects that I could find and came across this Jewel:

IBM has made modifying the laptop hard as possible: it won't boot without keyboard. However, it is possible to cheat bios to think there is keyboard with this piece of foil :)

It was in the documentation of a similar project done by Juho Roine using a Thinkpad 770.
Juho's project is very interesting and can be found at Juho Roine's DaliPC . His project is more that just a digital picture frame and gives me additional motivation and some good ideas for enhancements.

Juho discovered that three of the pins on the keyboard connector on the TP770 were shorted together. He has been kind enough to email me details. He explained that it was these shorted pins that informed the bios that the keyboard was present. He used a small piece of foil and electrical tape to short these pins on the system board KB socket.

On looking closely at my KB connector (under a magnifying glass - these old eyes aint what they used to be) I found that 4 pins were shorted together. I knew I would have difficulty cutting and inserting a very small piece of foil and successfully shorting "only" the four pins. So after thinking about it some more I came up with what I thought was a great idea - just cut off the connector from the keyboard assembly(which already had the four pins shorted) and just plug it in. The following pictures may or may not help explain:

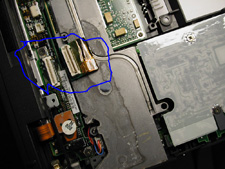
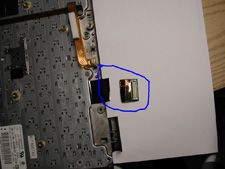
The Keyboard assy is upside down on the left with the ribbon cable sticking out to right and the connector - I cut it off using sharp scissors.
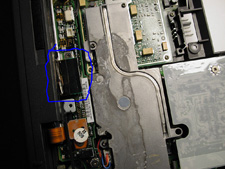
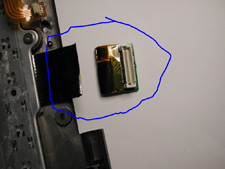
Just a closer view.


The first pic shows the system board KB socket with the "cutoff" connector to the right. The next picture shows the connector plugged into the socket.

Hooray - it boots and runs like a champ -------- Many thanks to Juho

Tomorrow I begin the LCD removal. (cross fingers)

Wednesday, August 17, 2005

I Applied Power, Turned It On, And .....

Got a 301 keyboard error during boot. This problem was previously mentioned by another who did this project using a Thinkpad. He had documented that if you disable the Trackpoint mouse using the Thinkpad configuration program; then the laptop would boot successfully without the keyboard.


At least it powered up and tried to boot.

I attached an external keyboard and mouse, and restarted the laptop. It booted up fine and I went back into the Thinkpad configuration program to verify that the Trackpoint had been disabled -- It had!

So, more research to find out how to get around this problem.

More soon .........

As Promised - Laptop Dismantle Begins

Here you see a perfectly good, working, Laptop computer:


Shortly thereafter, the first major removal piece -- the keyboard assembly:

The battery, CDROM, and Keyboard are gone -- maybe I had better pause here and see if it will still run.

Hardware Maintenence manuals, Technical Service manuals, and User Guides for the Thinkpad 600 are available in PDF format for download from the IBM site. These manuals layout pretty well how to dismantle the laptop. Removal of the keyboard assembly was pretty straight forward. You must take care when removing the ribbon cables for the keyboard and speakers which attach to the system board. These cables are pretty fragile - just take care.

Sunday, August 14, 2005

Everything's Working Right Now - (I'm almost Sure)

Well, I finally found a setting that eliminated the 10 minute screen blank issue.

In the Control Panel - Power Options, under the Advanced Settings tab: There is an option for PCI BUS Power Management. The options are "Automatic", and "Disable". The recommended setting is "Automatic".

Executing the "Disable" option eliminates the 10 minute screen blank issue - voila.

I know of no other issues that should interfere with the Laptop dismantle process.

I'm now totally controlling the laptop from my base/office PC. I'm adding/renaming files via the wireless network. I can reboot the laptop from the base PC also, using a little program called "Access Control" -- a basic, but effective remote control application.

At last check, I had spent $166 of my $200 limit. This little remote control application cost me $19. So, that leaves me $15 for miscellaneous items like a picture frame(cheap), matting etc.

It will be close, but should be do-able.

Saturday, August 13, 2005

Well I Thought I Had Everything Working Right?

Just when I thought I had everything working as I wanted - I discovered a problem. Maybe it's minor, but so far, I haven't found a solution.

I had never just booted the machine and let the slide show run for an extended period of time.

I did so yesterday and after 10 minutes, the screen went blank. You can hit any key, and the screen refreshes and the slide show continues for another 10 minutes.

I know, It sounds like a simple screensaver or power management issue, but......

I've set the screensaver = none in the display properties. I've set the powermanagement settings to "Always On" with "Turn off the Display" = to never and "Turn off the Hard disk" = to never.

I don't know what else to change, and it continues to go blank at 10 minutes.

I've asked over at the Thinkpads.com forums, but so far no response.

I've gotta get this fixed before I continue

Wednesday, August 10, 2005

A Run-down on the Post-Dismantle Configuration

Ok, I think I've got everything working to my satisfaction - post-dismantle.

From a hardware standpoint, it's running 228MB of RAM - It actually should be 288MB, and I don't currently know why it isn't. There is 32MB of base (non-removable) memory on the motherboard, and two slots for additional memory. According to the IBM documentation, you can add two 128MB modules for a total of 288MB max RAM. Well I did that, and the system only reports 228MB. The system originally had PC66 RAM, but PC100 should be compatible. It runs fine with 228, and I don't want to take the time to track down the missing 60MB, so I'm moving on.

The 4GB hard drive was originally partitioned into 2 - 2GB partitions using FAT. The "C" drive was pretty well consumed with the OS even though I had pared it down to be best of my ability. Using Partition Magic, I converted the file system to FAT32, and repartitioned it into 3GB and 1GB partitions. I will use the 1GB "D" drive for the slide shows, and everything else will be on the "C" drive. 1GB for slide shows is overkill, but hey - I've got plenty of HD space (how many times have you heard/said that?).

I've disabled all screen savers, automatic suspend modes .... etc, but I will verify that once more before I dismantle the laptop next week. I disabled the trackpoint mouse and hopefully that will allow me to boot the machine without a keyboard. When I dismantle the machine, I will permanently remove the floppy drive, the CDROM, the battery, and any other pieces and parts that are not essential for the machine to run.

On my primary PC I have a program called ACDSee. It's a graphics management and editing program that has a really good Slide Show creation capability. It generates a self-executing .exe file which is ideal for my purposes. My plan is to create the slide shows on the main PC, then send them to the DigimagR via the wireless network. The current/active slide show will always be named current show.exe and as I transmit a new show to the DigimagR, it will overwrite the existing one.

The DigimagR will then be re-booted in order to execute the new slide show.

That should be pretty much how it will work.

I would like to come up with a way to re-boot the machine from the network so that I can avoid a hard-down from just turning it off. It should be do-able, I just have to find out how ---- So, back to the internet for a little more research.

Don't worry, I'm not going to delay the dismantle again -- I'll do it next week I promise.

Tuesday, August 09, 2005

I Have A Distinct Advantage

Once again, I'm reminded of the distinct advantage I have in regard to this project. This advantage is, once again, a direct result of the unlimited information - available at the touch of a key - on the internet. The advantage also is because of the several/many who have previously completed this very project and the fact that they documented the steps in a manner that has proved very beneficial to me. I've read through many if not most of these blogs, wiki's, documents, in an attempt to lay out my own process and especially to uncover those little gotchas that I would likely overlook.

One of the more important pieces of guidance that I received was: to get all of the OS/ software pieces of the project implemented and working the way I want them to before dismantling the laptop. Remember that when I'm done, the laptop will not have a keyboard or mouse; so the machine has to boot up and execute the looping slideshow application on it's own. I will be able to add/replace the slideshow application via the wireless network, but the only way to reboot the machine and restart the application is to, turn it off and back on.

Here are some of the things that I would have overlooked, or not thought of, if I had proceeded with this project without the benefit of information and insight of some of those who did this project before me:

1. Any Screensaver needs to be disabled.
2. Any Suspend mode activity needs to be disabled
3. The Thinkpad laptop will boot without a keyboard only if the trackpoint mouse has been disabled. (I would have for sure missed this one)

There are likely several other gotchas, and I'll describe them as I get to them, but the three above are easily addressed if the laptop is intact and in good working order.

In my next post, I'll describe my currently working configuration including the slide show application and how it's functioning on the intact laptop.

The grandkids are coming in today and will be with us for a week, so I'll not likely spend much time on this project as I'll be having great fun with 10yr old Calli, and 7yr old Max.

I will start dismantling next week - I promise!!

Sunday, August 07, 2005

Back to the Task - With Some Modifications

I've spent a good bit of time every day this past week exploring Linux. I've had at least 6 different distributions running on the laptop and was searching for a distribution which would easily support wireless networking. As I mentioned earlier, I would like to use the home wireless network to upload and modify the slideshows running on the DigimagR. Long Story-short, I finally did get one of the distributions up running wireless, but it was a major chore.

When I originally decided to do this project is was based on my thinking that the Linux OS in general, required much less hardware (cpu, memory, HD.... etc) than MS Windows. I quickly discovered that to not be the case with all of the distributions. Most all of them would push the limits of the existing laptop.

The Thinkpad 600 that I purchased on EBay, came with Windows 2000 Prof installed, and it ran well. I'm also comfortable in Windows and have made the decision to stay with the Win2K install for this project.

I'm not abandoning my interest in Linux, and will come back to it later as a separate project. For now though, I'm going to concentrate on completing this project with the OS I'm most comfortable with. I've downloaded all priority updates from microsoft and the machine is now pretty clean and runs well.

Truth be known, I think I've been looking for excuses to not physically tear into the laptop. There's something daunting about taking a perfectly good laptop and taking it completely apart -- Actually the really daunting thought is putting the necessary parts back together and making it work.

Gotta bite the bullet sooner or later -- for right now, I'm gonna sit back, play a little online poker and give it some serious thought.

Just a little later -- I promise!