Problem Solved
The booting without a keyboard problem was becoming very difficult indeed. I asked on several Tech Forums if there was a way to boot without a keyboard. The consensus answer was No, it couldn't be done.
I began to contemplate taping the keyboard assembly onto the back, but that really seemed klugy to me.
I went back and re-read the details of all of the Thinkpad based digital picture frame projects that I could find and came across this Jewel:
IBM has made modifying the laptop hard as possible: it won't boot without keyboard. However, it is possible to cheat bios to think there is keyboard with this piece of foil :)
It was in the documentation of a similar project done by Juho Roine using a Thinkpad 770.
Juho's project is very interesting and can be found at Juho Roine's DaliPC . His project is more that just a digital picture frame and gives me additional motivation and some good ideas for enhancements.
Juho discovered that three of the pins on the keyboard connector on the TP770 were shorted together. He has been kind enough to email me details. He explained that it was these shorted pins that informed the bios that the keyboard was present. He used a small piece of foil and electrical tape to short these pins on the system board KB socket.
On looking closely at my KB connector (under a magnifying glass - these old eyes aint what they used to be) I found that 4 pins were shorted together. I knew I would have difficulty cutting and inserting a very small piece of foil and successfully shorting "only" the four pins. So after thinking about it some more I came up with what I thought was a great idea - just cut off the connector from the keyboard assembly(which already had the four pins shorted) and just plug it in. The following pictures may or may not help explain:
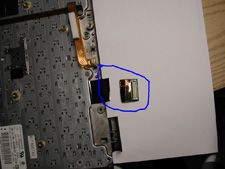 The Keyboard assy is upside down on the left with the ribbon cable sticking out to right and the connector - I cut it off using sharp scissors.
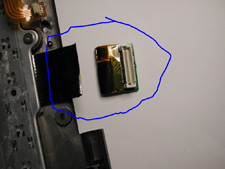 Just a closer view.
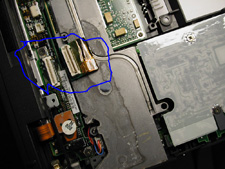
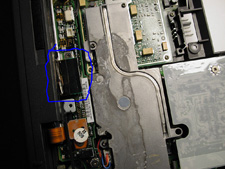
The first pic shows the system board KB socket with the "cutoff" connector to the right. The next picture shows the connector plugged into the socket.
Hooray - it boots and runs like a champ -------- Many thanks to Juho
Tomorrow I begin the LCD removal. (cross fingers)
posted by Don @ 5:34 PM
0 comments
![]()


0 Comments:
Post a Comment
<< Home